Windows XP Professional SP3 x86 June 2018 Free Download Latest Version for Windows. The program and all files are checked and installed manually before uploading, program is working perfectly fine without any problem. It is full offline installer standalone setup of Windows XP Professional SP3 x86 June 2018 Free Download for 64 Bit and 32 bit version of windows.
Windows XP Professional SP3 x86 June 2018 Overview
Windows XP Professional SP3 x86 June 2018 Free Download is an operating system introduced in 2001 from Microsoft’s Windows family of operating systems, the previous version of Windows being Windows Me. The “XP” in Windows XP stands for experience. Microsoft called the XP release its most important product since Windows 95. Along with a redesigned look and feel to the user interface, the new operating system was built on the Windows 2000 kernel, giving users a more stable and reliable environment than previous versions of Windows, Includes ALL the latest Windows XP and POSReady 2009 Updates/Hotfixes until 12.6(June).2018 and will also automatically receive new Windows XP (POSReady 2009) Updates until April 2019 and no Windows XP Activation or CD-Key is required. You can also download Microsoft Windows 10 June 2018 x64.
Windows XP Professional SP3 x86 June 2018 Free Download was made available in in two versions, Windows XP Home and Windows XP Professional. The company focused on mobility, such as technology allowed for in 2001, and included plug and play features for connecting to wireless networks. The operating system utilizes 802.11x wireless security standard. The initial Windows XP release was followed by the release of Windows XP 64-Bit Edition (v2002), Windows XP Media Center Edition and Windows XP 64-Bit Edition (v2003). A Help file is also included in the ISO/Disc folder “..\OEM\WinXPPx86IE” with lots of useful information, Windows XP Professional SP3 x86 June 2018 Free Download such as on how to install Windows XP with an USB Flash Drive and on how to integrate your own SATA/AHCI drivers and much more. You also may like to download Windows 7 SP1 X64 12in1 June 2018.
Features of Windows XP Professional SP3 x86 June 2018 Free Download
SHA-1; 5ca7b5fd8a51ff40e1ecbcaf1614720c34dfa630
Windows XP Professional SP3 x86 June 2018 Free Download Updates:
- Windows XP Service Pack 3 (KB936929).
- Windows XP and POSReady 2009 Updates/Hotfixes until 12.6(June).2018.
- Windows Genuine Advantage Validation v1.9.42.0 (KB905474) {Cracked}.
- Windows Internet Explorer v8 (Roll Back to 6 possible).
- Windows Media Player v11 (Roll Back to 9 possible).
- Windows Remote Desktop Connection 7.0 (KB969084, KB2813347-v2, KB2870165-v3).
- Windows Rights Management Client (KB979099).
- Windows Driver Frameworks 1.9 – User Mode (KB970158) and Kernel Mode (KB970159).
- Windows Feature Pack for Storage v1.0 (KB952013) – Image Mastering API v2.0 (KB932716-v2, KB952011).
- Windows Feature Pack for Storage v1.0 (KB952013) – ICCD Smart Card Driver.
- Windows Installer v4.5.6002.24298 (KB942288, KB4087398).
- Windows XP exFAT file system driver update package v1.0 (KB955704).
- Windows XP Root Certificates Update [April 2018 v41.0.2195.1807] (KB931125).
- Windows XP Revoked Roots Certificates Update [December 2015 v8.0.2195.1512] (SA3123040).
- Windows XP CAPICOM v2.1.0.2 (KB931906).
- Microsoft European Union Expansion Font Update v1.2.
- Microsoft WinUSB 2.0 (KB971286).
- Microsoft XML Paper Specification Essentials Pack v1.2.
- Microsoft XML Core Services v4.0 SP3 4.30.2117.0 (KB2758694).
- Microsoft Web Folders v12.0.6612.1000 (KB907306, KB2526086/Rosebub).
- Microsoft Windows Browser Choice (KB976002-v5).
- Windows Update v7.6.7600.256.
- Windows Update Web Control v7.6.7600.257.
- Microsoft Update Web Control v7.6.7600.257.
- Microsoft Update Catalog Web Control v7.4.7057.249 (build time-stamp 130620-1021).
Windows XP Professional SP3 x86 June 2018 Free Download Runtime Libraries:
- Microsoft DirectX 9.0c End-User Runtimes v9.29.1974 (June 2010).
- Microsoft .NET Framework [Up-to-Date/12.6(June).2018]: 1.1 SP1, 2.0 SP2, 3.0 SP2, 3.5 SP1, 4.0 Full – {Optional}.
- Microsoft Visual C++: 2002 (v7.0.9975), 2003 (v7.10.6119), 2005 SP1 (v8.0.50727), 2008 SP1 (v9.0.30729), 2010 SP1 (v10.40219), 2012 Update 5 (v11.0.61135), 2013 Update 5 (v12.0.40664), 2017 (v14.14.26429).
- Microsoft Visual Basic: v1.00, v2.0.9.8, v3.0.5.38, v4.0.29.24, v5.2.82.44, v6.1.98.39 (SP6 Update KB2911777, KB2992332).
Windows XP Applications:
- Microsoft Calculator Plus v1.0.0.908 {Replaces the default Calculator}.
- Microsoft BitLocker To Go Reader v1.0 (KB970401).
- Windows XP Powertoy – ClearType Tuner v1.01 – {Optional}.
- Windows XP Powertoy – Alt-Tab Replacement v1.0 – {Optional}.
- Windows XP User Profile Hive Cleanup Service v2.0.49 Beta – {Optional}.
- Windows XP GDI+ Detection Tool v1 (KB873374).
- Windows XP QFEcheck v6.2.29.0 (KB282784).
Additional Applications:
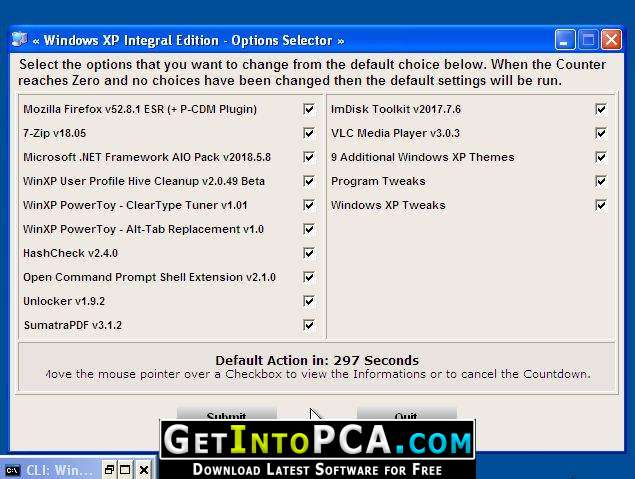
- 7-Zip v18.05 – {Optional}.
- Mozilla Firefox v52.8.1 ESR (+ Primetime-CDM Plugin) – {Optional}.
- VLC Media Player v3.0.3 – {Optional}.
- Unlocker v1.9.2 – {Optional}.
- SumatraPDF v3.1.2 – {Optional}.
- ImDisk Toolkit v2017.7.6 – {Optional}.
- HashCheck v2.4.0.55 – {Optional}.
- Open Command Prompt Shell Extension v2.1.0 – {Optional}.
Windows XP Patches/Fixes:
- Extended Update Support Patch v1.0: Extends the Windows XP update support from “April 2014” till “April 2019” (POSReady 2009 Updates).
- TCP/IP Patch v1.0: Allows you to have 16777215 (Maximum) Half-Open TCP Connections instead of 10.
- UxTheme Patch v1.0: Allows you to use un-signed Custom Visual Styles (Themes).
- TermSrv Patch v1.0: Allows you to have multiple concurrent remote desktop connections.
- SFC Patch v1.0: Allows you to disable and enable the Windows File Protection with the registry entry “SfcDisable”.
- SndRec32 Patch v2.0: Fixes a Sound Recorder error message on a computer that has more than 2GB of RAM and Increases the Recording Time Limit from 60 Seconds to 999 Seconds.
- NTDETECT Patch v1.1: Resolves a problem with some buggy BIOS’es, when installing Windows XP with an USB Flash Drive.
- RAID-5 Patch v1.0: Enables Software RAID-5 Support.
- SERVICES Patch v1.0: Includes more assigned port numbers for well-known services defined by IANA.
- MNF4SBF v3.1: Fixes a Microsoft .NET Framework 4 bug that causes a slow Windows XP boot up.
- Fixed Missing ClipBook Viewer shortcut in the Start Menu (accessor.inf).
Windows XP Tweaks:
- Pre-Configured Windows XP Settings – {Optional}.
- Pre-Configured Program Settings – {Optional}.
- Suppressing Microsoft Update nagging to install Windows Genuine Advantage Notifications v1.9.40.0 (KB905474).
- Suppressing Microsoft Update nagging to install Windows XP End Of Service Notifications (KB2934207).
- Suppressing Microsoft Update nagging to install Windows Malicious Software Removal Tool v5.39.12900.0 (KB890830).
Extras:
- Ported Compatible Updates/Hotfixes and RTM files from Office 2000, Windows 2000, Windows POSReady 2009, Windows Vista, Windows 7 (More details in the ReadMe file).
- DriverPacks BASE v11.09.01.2b – With the Driver Packs: MassStorage v18.04.21 (SATA/AHCI), LAN v18.04.21 (Cable Ethernet) – Compressed = 23 MB / Uncompressed = 143 MB – {Removable}.
- 9 Additional Windows XP Themes – {Optional}: “Windows XP Embedded”, “Black Mesa v2.0”, “ChaNinja Style RC5 v1.0”, “Disney – It’s a Magical World v2.0”, “NeoGeniX LS v1.0”, “Luna Element Black v5.1 + CSS”, “Royale Remixed v1.47”, “Windows 7 Colors v1.1”, “Zune Final v1.0”.
- Windows File Protection Utility v1.4 (In “Start Menu -> All Programs -> Accessories -> System Tools”).
- Windows XP CD-Key Changer v1.2 (In ISO/Disc folder “..\OEM\WinXPPx86IE”).
- Windows NT Registration Changer v1.0 (In ISO/Disc folder “..\OEM\WinXPPx86IE”).
- Text file with some valid WGA CD-Keys (In ISO/Disc folder “..\OEM\WinXPPx86IE”).
- Help file with lots of useful information (In ISO/Disc folder “..\OEM\WinXPPx86IE”).
- Patched and Modified files are all digitally signed with a custom certificate.
Bugged Updates/Files that have not been added:
- KB2926765 (shlwapi.dll) / This Update was not added due to a Microsoft bug with the changing of the Internet and E-mail item on the Start menu.
- KB4134651 (oleaut32.dl) / This File was not added due to a Microsoft bug that will cause problems with some programs.
What is Removed:
- Nothing was removed that could cause System or Software problems, only outdated and unneeded components were removed.
- Applications: “Address Book”.
- Multimedia: “Images and Backgrounds”, “Movie Maker”, “Music Samples”.
- Network: “MSN Explorer”, “Netmeeting”, “Outlook Express”, “Windows Messenger”.
- Operating System Options: “Blaster and Nachi removal tool”, “Desktop Cleanup Wizard”, “Out of Box Experience (OOBE)”, “Tour”.
- 3rd-party Drivers: “Display Adapters”, “ISDN”, “Logitech WingMan”, “Microsoft SideWinder”, “Scanners”, “Sony Jog Dial”, “Toshiba DVD decoder card”.
- Disc Files: “clock.avi”, “flash.ocx”, “mmc.chm”, “plugin.ocx”, “rdsktpw.chm”, “swflash.inf”, “swtchbrd.bmp”, “yahoo.bmp”.
- Disc Folders: “DOTNETFX”, “SUPPORT”, “VALUEADD”, “I386\WIN9XMIG”, “I386\WIN9XUPG”.
General:
- Based on the original English (International) Windows XP Professional SP3 x86 (Volume License) ISO file from Microsoft.
- Fully Updatable and passes all Validation Checks and no Windows XP Activation or Crack or CD-Key is needed.
- The installation process is Unattended with the Recovery Console and Repair option, A valid WGA CD-Key and all the other user required inputs are filled in automatically during the Windows XP installation.
- Runs a little faster than a regular Windows XP because all the Windows XP Update are slipstreamed and because some outdated and useless components have been removed (Nothing was removed that could cause system or software problems).
- After the Windows XP installation a menu will appear to choose which {Optional} extras to integrate. If nothing was selected after 5 minutes then the default selected {Optional} extras are integrated.
- All Custom Settings are also applied on new created user accounts on the first account login.
- All Modified files are Digitally Signed with a separte Certificate.
Important:
- Windows XP Professional SP3 x86 June 2018 Free Download is not for Upgrading you must make a clean installation on a formatted Hard disk drive or Partition.
- Before doing a real installation it is recommended to do a test installation with a Virtual Machine program, such as VirtualBox.
- Because of a Microsoft bug since 2017 you have to always install the latest “Internet Explorer 8 Cumulative Security Update” manually (Downloadable via the Microsoft Update Catalog) before you can get the newest updates over the Windows XP Update Center or else it will take extremely long to find the newest updates and the svchost.exe file will then also use a lot of CPU power.
Administrative:
- To modify this Windows XP open the ISO file “Windows XP Professional SP3 x86 – Black Edition 201X.XX.XX.iso” with a Zip-Archive Program and extract everything except the “[BOOT]” folder (if present) into an empty folder and use nLite to make a Bootable ISO file after the modifications.
- To get a list of all the installed Windows XP Updates run the DOS Command “qfecheck” in a Command Prompt Window.
- With a little bit of scripting knowledge it is possible to integrate additional Programs and Custom Settings by editing the files with a Text Editor in the ISO/Disc directory “..\OEM\RunOnce” and also the files “WINNT.SIF”, “NLITE.IN_”, “WXPIERO.INF” and “WXPIERO.CM_” in the ISO/Disc directory “..\I386” (DOS uncompress Command Line is [expand -r “FOLDER\FILE.IN_”] and DOS compress Command Line is [makecab “FOLDER\FILE.INF”]).
- A full automated installation can be done by removing the “;FUI#” with a Text Editor from the file “WINNT.SIF” in the ISO/Disc directory “..\I386”. If setting the “Repartition” option from “No” to “Yes” then the Windows XP Setup will not only skip the EULA agreement but will then also automatically format the main Hard Disk Drive and install itself on a new created partition. Note when doing this changes then the Recovery Console and Repair option can then no longer be accessed anymore directly from disc.
Ported Windows Updates/Hotfixes and RTM files:
- Compatible Office 2000 Updates/Hotfixes: KB921606 (Without html32.cnv, mswrd632.cnv, mswrd832.cnv, wpft532.cnv, wpft632.cnv).
- Compatible Windows 2000 Updates/Hotfixes: KB291343.
- Compatible Windows Embedded POSReady 2009 RTM files (v5.1.2600.5669): explorer.exe, logon.scr, msgina.dll, sysdm.cpl, winbrand.dll, xpsp3res.dll (en-US).
- Compatible Windows Vista Updates/Hotfixes: KB973473-v2 | KB977585-v2.
- Compatible Windows Vista RTM files: makecab.exe (SP1), mimefilt.dll (SP2), mimefilt.dll.mui (SP2), msdelta.dll (SP2), nlhtml.dll (SP2), nlhtml.dll.mui (SP2), offfilt.dll (SP2), offfilt.dll.mui (SP2), PhotoMetadataHandler.dll (SP2), windowscodecsext.dll (SP2), WMPhoto.dll (SP2), WMPhoto.dll.mui (SP2), WUDFUsbccidDriver.dll (SP2).
- Compatible Windows 7 Updates/Hotfixes: KB976002 | KB2575928 | KB2616879 | KB2870165-v3 (Without kernel32.dll, rdpwd.sys, rdpwsx.dll, termsrv.dll) | KB2958997-v4 (Without pjlmon.dll).
- Compatible Windows 7 RTM files: mxdwdui.dll (SP1), WdfCoInstaller01007.dll (SP0 – WdfCoInstaller01009.dll), winusb.sys (SP1), WinUsbCoinstaller.dll (SP1), WUDFCoinstaller.dll (SP1), WUDFHost.exe (SP1), WUDFPf.sys (SP1), WUDFRd.sys (SP1), WUDFSvc.dll.mui (SP1), WUDFUpdate_01007.dll (SP0 – WUDFUpdate_01009.dll), WUDFx.dll (SP1).
- Updates the Windows XP Components: Browser Choice, Remote Desktop, Windows Imaging Component, Windows Driver Frameworks, WinUSB, XPS Printer and Common Printer Drivers.
[———- HELP GUIDES ———-]
How to install Windows XP new:
- BACKUP ALL YOUR FILES ON A SEPARATE STORAGE DEVICES.
- Download all the Up-to-Date Drivers for your Computer.
- Burn the “Windows XP Professional SP3 x86 – Black Edition 201X.XX.XX.iso” ISO file as a Image file with your burn program.
- Insert the Windows XP disc into your CD/DVD-ROM drive and restart your computer and boot from the Windows XP disc.
- Now follow the Windows XP Setup wizard instructions and make a clean installation on a formatted Hard Disk drive or Partition.
- If you install Windows XP on a Solid State Drive (SSD) then it is recommended to align the Windows XP Solid State Drive (SSD) or Partition to increase the Solid State Drive (SSD) performance, because at the Windows XP installation Windows XP does not align a new created Partition correctly for a Solid State Drive (SSD). The easiest way to do this on WIndows XP is to install the free prgram version of “MiniTool Partition Wizard” and then you have to simply Start the program and Right-Click on the Windows XP Solid State Drive (SSD) or Partition and then Click on “Align” and then Click on “Apply”.
How to remove the extra drivers and slipstream (integrate) your own SATA Drivers into Windows XP:
- Find the SATA Driver for your computer that includes a “txtsetup.oem” file and then extract all the driver files into an empty folder.
- Create a new folder and name it “WinXP-IE” and then open the ISO file “Windows XP Professional SP3 x86 – Black Edition v201X.XX.XX.iso” with a Zip-Archive Program and then extract everything except the “[BOOT]” folder (if present) into the “WinXP-IE” folder.
- Remove the DriverPacks BASE and the extra drivers by starting the file “DriverPacks BASE – Remover vX.X.X.cmd” in the directory “..\WinXP-IE\OEM”.
- Download and Install the Program nLite from the Website.
- Start nLite and click on Next and then Browse to the “WinXP-IE” folder and after the loading process click then two times on “Next” and then select the options “Drivers” and “Bootable ISO only” and then click on again “Next”.
- Now Click on “Insert” and choose “Multiple driver folder” and then Browse to downloaded x86 (32-bit) SATA Drivers folder and then click on “OK”.
- Select the correct Windows XP x86 (32-bit) SATA driver for your computer and click on “OK” and then choose “Textmode driver” and select all the options in the “Textmode integration options” Box and click on “OK” and then on “Next” and then on “Yes” and after the integration is completed click on “Next”.
- In the “Label” field write “WinXPPx86IE” or whatever you want and then click on “Make ISO” and browse to the directory where you want to save the new Windows XP ISO file.
- For more information visit the forum on the website or use a Web Search Engine like Google and search for the keywords “Windows XP nLite SATA”.
How to install Windows XP from a USB Flash Drive:
- For this to work you need to make sure that you Computer (Motherboard BIOS) has an USB Booting option.
- BACKUP ALL YOUR FILES ON A SEPARATE STORAGE DEVICES.
- Download the latest WinSetupFromUSB version from the Website.
- Create a new folder and name it “WinSetupFromUSB” and then extract the WinSetupFromUSB tool with a Zip-Achive program into the “WinSetupFromUSB” folder.
- Create another new folder and name this one “WinXP-IE” and then open the ISO file “Windows XP Professional SP3 x86 – Black Edition v201X.XX.XX.iso” with a Zip-Archive Program and then extract everything except the “[BOOT]” folder (if present) into the “WinXP-IE” folder.
- Plug-in a USB Flash Drive into the computer and then start the WinSetupFromUSB tool from the main “WinSetupFromUSB” folder.
- Now select the USB Flash Drive in WinSetupFromUSB and then select the option “Auto format it with FBinst” and choose “NTFS” or FAT32/FAT16 when you install Windows XP on a computer from the Stone Age.
- Select the option “Windows 2000/XP/2003 Setup” and then click on the button “…” and browse to the “WinXP-IE” folder.
- Now click on the “GO” button and after WinSetupFromUSB is done restart your computer and Boot from the USB Flash Driver.
- Alternative tools for making a Windows XP Flash installation are “WinToFlash” and “Rufus”.
Roll Back to Internet Explorer 6 or Windows Media Player 9:
- !WARNING! You need to first insert an ORIGINAL english “Windows XP Profesional Service Pack 3 (x86)” Disc/Image into your computer before you do a Roll Back or otherwise the Desktop will no loanger load after a computer restart.
- Open the file “C:\WINDOWS\inf\sysoc.inf” and remove the keyword “HIDE” from the line “IERollBack” (Internet Explorer) and “WMPRollBack” (Windows Media Player).
- Now go to “START -> Control Panel -> Add or Remove Programs -> Add/Remove Windows Components” and then first select “Internet Explorer” or “Windows Media Player” if it’s not already selected and then click on Next and after that deselect “Internet Explorer 8” or “Windows Media Player 11” and then click again on Next and then restart your computer.
- When being promoted for a file then browse to the select folder “I386” on the ORIGINAL english “Windows XP Profesional Service Pack 3 (x86)” Disc/Image.
- After the computer reboot start the Windows XP Update Center and install all the Internet Explorer 6 and Windows Media Player 9 updates and then hide the Internet Explorer 8 and Windows Media Player 11 updates by clicking on the [+] and then select the option “Don’t show this update again.”.
- The MD5 Hashes for the original english “Windows XP Profesional Service Pack 3 (x86)” ISO files are:
- MD5 Hash: 5BF476E2FC445B8D06B3C2A6091FE3AA (Windows XP Professional with Service Pack 3 (x86) Volume English.iso).
- MD5 Hash: F424A52153E6E5ED4C0D44235CF545D5 (Windows XP Professional with Service Pack 3 (x86) Retail English.iso).
- MD5 Hash: 9BB3CB003E2C6005FCCC28C305BE05FF (Windows XP Professional with Service Pack 3 (x86) OEM English.iso).
- Enter the MD5 Hash into a Web Search Engine or P2P Search Engine to find a download link.
Troubleshootings:
- If you do a USB Flash installation and you get a “hal.dll” error then try this:
- Boot from the USB Flash Driver and select the Setup Option 1 and if that doesn’t help then select the Setup Option 2 and if that also doesn’t help then select the Setup Option 3.
- If you can’t boot from the Windows XP disc or USB Flash Drive then try this:
- Restart your computer, and if the computer startS press the key on your keyboard to enter the “Boot Priority Menu” and then select the Windows XP Setup Drive.
- Restart your computer, and if the computer starts press the key on your keyboard to enter the “BIOS Menu” and then set the Boot Priority for the Windows XP Setup Drive above the Hard Disk Drive.
- If during the Windows XP installation you get Corrupted file error(s) or Missing file error(s) then try this:
- Burn the Disc at the lowest possible speed and also enable the option to check the disc for errors after the burning process.
- Do not use an old scratched Disc.
- Clean your CD/DVD-ROM device(s).
- Use another or buy another CD/DVD-ROM device.
- Install Windows XP from a USB Flash drive.
- If during the Windows XP installation you get a Blue Screen Error or if the Screen stays Black for more than 2 minutes or the Windows XP Setup Hangs for more than 10 minutes or when no Hard Disk Drive(s) are found or if there is a Hard Disk RAID problem then try this:
- Use a Floppy disk and load the SATA driver with the F6 option at the beginning of the Windows XP Setup.
- Slipstream your own SATA drive into Windows XP, Read the HELP GUIDES section on how to slipstream your own SATA driver into Windows XP.
- Try to change the BIOS setting SATA/AHCI to OFF or the SATA Mode to IDE (This option is a workaround and will reduce the Hard Disk Drive performance around 3 to 8 percent).
- If you have a Microsoft .NET Framework problem then try this:
- Uninstall all the Microsoft .NET Framework versions and restart your computer and then reinstall all the Microsoft .NET Framework versions over the Windows XP Update Center.
- Uninstall all the Microsoft .NET Framework versions and restart your computer and then download and run the .NET Framework Cleanup Tool ( and after that restart your computer and install all the Microsoft .NET Framework versions over the Windows XP Update Center.
- If you plugin a Device and you get the error that the MTP Device cannot be installed then try this:
- Go into your Device menu settings and turn off the USB Debugging and then unplug your Divice from your computer and then restart your Device and your Computer.
- Go into your Device menu settings and switch your Device from MTP to MSC and then unplug your Divice from your computer and then restart your Device and your Computer.
- Use a Web Search Engine like Google and try if you can’t find a Windows XP MTP hack for your Device (Search example: “Device Model” MTP Windows XP).
Windows XP Professional SP3 x86 June 2018 Free Download Technical Setup Details
- Software Full Name: Windows XP Professional SP3 x86 June 2018
- Setup File Name: _igetintopc.com_DriverPack_Solution_17.7.101_2018.rar
- Size: 693 MB
- Setup Type: Offline Installer / Full Standalone Setup
- Compatibility Architecture: 64 Bit (x64) 32 Bit (x32)
- Latest Version Release Added On: 29 Jun 2018
- Developers: Microsoft
System Requirements for Windows XP Professional SP3 x86 June 2018
- System Requirements are (Recommended/Minimum): 1200/350 MegaHertz x86 Processor, 512/128 MegaBytes of RAM, 1024×768/800×600 Video Adapter, 10/4 GigaByte of available Hard Disk space.
- If you can’t find the drivers for your computer then try out the tools “Ma-Config” or “DriverPack Solution“, But it is recommend to download the drivers directly from the Website of the chipset manufacturers.
- If you miss some default Windows XP programs then take a look in the Windows XP Favorites folder for Weblinks to better alternative programs. Some of the default Windows XP programs are removed because they have been replaced by Microsoft a long time ago. For example the Outlook Express program was replaced years ago with the freely available Windows Live Mail program.
- You can change the Windows XP CD-Key with the tool “Windows XP CD-Key Changer vX.X.vbs” that you find in the ISO/Disc directory “..\OEM\WINXPPx86BE”.
- You can restarted the WinXP-IE Options Selector by execute the file “WinXPPx86IE – Setup.cmd” in ISO/Disc directory “..\OEM\RunOnce”.
- If you have a question or a problem then visit the Website, But first make sure if you can’t find the solution in 10-20 minutes on a Web Search Engine like Google (http://www.google.com) or over the MSFN Forum Search Engine.
How to Install Windows XP Professional SP3 x86 June 2018
- Extract the zip file using WinRAR or WinZip or by default Windows command.
- Open Installer and accept the terms and then install program.
Windows XP Professional SP3 x86 June 2018 Free Download
Click on below button to start Windows XP Professional SP3 x86 June 2018 Free Download. This is complete offline installer and standalone setup for Windows XP Professional SP3 x86 June 2018. This would be compatible with 32bit and 64bit windows.